Table Of Content

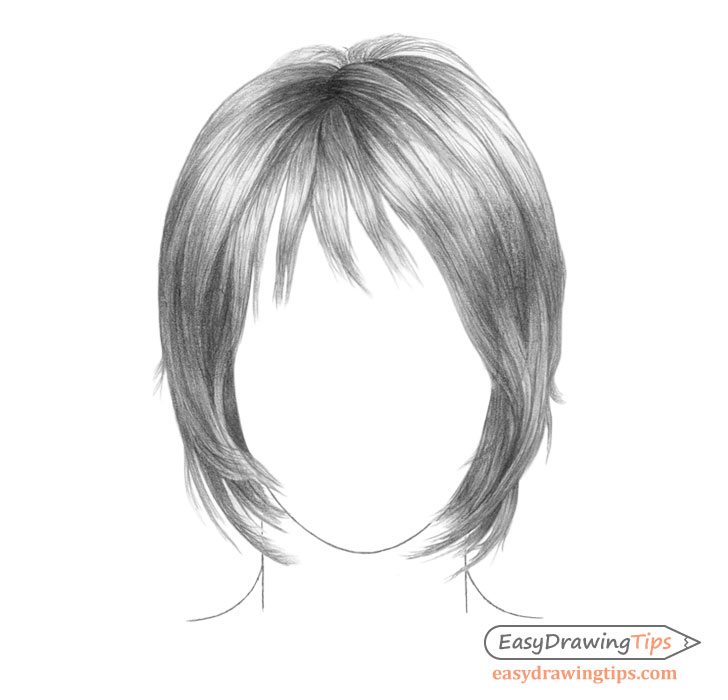
It is always easier to get somewhere when you know whereyou want to go. Shade the haircut in a more definite way, drawing shadows between groups of curls. Afro-textured hair has a lot of curly strands and texture. Draw the direction of the hair, creating the 3D form of the haircut. Shade the hair now, thinking in terms of strands, not single hairs. Outline the whole hair, following the rhythm of strands.
Step 1
Best automatic hair curlers 2024: Perfect waves in super-quick time - Expert Reviews
Best automatic hair curlers 2024: Perfect waves in super-quick time.
Posted: Tue, 06 Feb 2024 08:00:00 GMT [source]
This character will have straight hair, cut just over the shoulders. I think no bangs would be better, but I want some hair to cover one eye, and the tips of the hair to curl inwards. Add more layers of strokes over top of the first one to smooth out the gradients and darken the overall shading. Again be sure to leave some distance between the strokes to give an effect of individual hairs. Erase the parts of the head (including the hairline) that are hidden by the hair once you are done drawing it’s basic shape. Begin the drawing by first outlining the entire shape of the head (including the ears).
Steps

This will help you achieve realistic curls with plenty of volume. Drawing curly hair is really fun and absolutely great for building confidence when it comes to adding texture. Drawing hair isn’t just a bunch of lines in boring repetitive patterns. Use the 4 techniques below to make your drawings more interesting to the eye. As I continue drawing I look for "ribbons" of hair to indicate, usually with a highlight and halftone.
Adding Values:
When learning how to draw hair, one way to reinforce this flow andinterconnectedness while improving the accuracy of your drawing is tolook for gestures. In this way, you can make sure that every linevisually leads to another line in the drawing. Draw some strands on the side, too, to add some texture. Don't draw them as simple straight lines, but rather as narrow "Y" shapes (normal and upside down). Adding realistic hair to a portrait can make it come to life.
Art Periods – A Detailed Look at the Art History Timeline
The below image includes hairstyles consisting of irregular layers and overlapping locks. If we only had the silhouette, we wouldn’t notice all these details, thus I need to contrast the different sections in order to highlight these shapes. Slowly darken the drawing by applying more layers of overlapping strokes. Be sure to leave some space between them to create an effect of individual hairs. Although unlike the previous example you can make them slightly less apparent to give the hair a smoother and neater look. Mostoften I suggest to draw all block ins using straight lines.
I am going to use the value scale to define details and give a 3D effect to the hair shapes. • Hair does not form a compacted shape, nor a consistent one. It is very light, so when the character moves, the wind, the humidity, or anything that surrounds it can affect its silhouette.
How to Draw an Eagle Head Step by Step
In this quick visual tutorial, you’ll learn how to color hair in your illustrations. Click the link underneath the photo to view the full tutorial. Hair is affected by gravity and, on the contrary, on the top of the head, the hair on the sides falls down. The small volume it can have is because of bouncing with the ears. Use several short, curved strands to give it a bit more volume but keep it close to the head. For this part, we’ll be using the diagram from section 1 and following the direction of the hair when pulled back.
Top Articles in Category
How to draw an anime character in Procreate - Creative Bloq
How to draw an anime character in Procreate.
Posted: Thu, 31 Aug 2023 07:00:00 GMT [source]
To delineate this area draw darker lines starting from the center. As we get to the right side of the hair, let’s turn our attention to the hair on top of the head. The pen should be pressed more firmly during this motion. Once again, pay close attention to your reference image to guide you.
Preparation and Source Image
On the sides of the hairline, add small soft lines to hint at the beginning of the hair. Use the diagram below as a guide if you’re feeling lost. In the following sections, we are going to use two shading techniques for the two types of hair we’ll be exploring. If you can, draw your own head base, but if what you’re looking for is pracrice, you can printe the one we have right here and draw on top of it. Afterward, add depth to the hair by adding numerous lines to each lock of hair.

Move your pencil to the hair part and sketch bouncy, cloud-like patterns until you are just above the shoulders (or wherever you prefer). Afterward, it is time to fill in the hair with more texture, so add long and short lines throughout the hairstyle. Starting a little above the hairline (or forehead), draw large petal-like shapes to create the bangs. Continue to fill in the hair with texture, adding more lines to the hairstyle to indicate volume. • The little strands on Step 3 follow a very similar direction, but slightly more pronounced, enough to add dynamism to the shape of the hair clump. First, for drawing both female hair and male hair, we must define the hairline and areas of our character’s hair.
Make sure to fill it all and to make some of the curls noticeable outside of the hair shape. To do this, move your pencil to the hair part and draw several lines in the direction of where the hair grows. These lines can vary in length, from long to short, just so long as they follow the hairstyle. Darlene created RFA In 2013 with the goal of sharing simple yet detailed drawing tutorials with other artists on the world wide web.
I’d recommend researching and practicing as much as possible. Let’s keep in mind that there is always space between strands and over layers of hair, which builds up to create volume. I might change my mind later on, but this stage allows me to see my hair ideas more clearly. Same as the other example begin by drawing an outline of the entire shape of the head. Similar to the first example begin by drawing the main shape of the hair with the largest details over top of the head/hairline.
In this case it will also be the outline of the whole haircut. This will give the hair some detail and add depth to the whole haircut. Don't press too hard, and don't make the lines too tight. Make sure you take note of this quality on the hair within the source image as you draw. We can keep doing this until we come to the moments of overlapping. Remember that the hair generally is exposed to light until it overlaps with other clumps of hair.
Don’t worry about erasing or trying to ensure everything is just right. Your primary focus should be getting your ideas out uninterrupted. Repeat the steps above for the other side, although symmetry looks nice. The beauty of hair lies in imperfections and asymmetry, so try to keep both sides different. With the powdered graphite and your brush, tap around the head to define the hair’s size and shape. Use significant circular movements to give it a “cloudy” effect.